operator实现步骤 正式开始使用kubebuilder来实现operator,关于operator原理可以看之前文章介绍,根据官网教程中的步骤来初始化一个operator项目:
1 kubebuilder init --domain my.domain --repo my.domain/guestbook
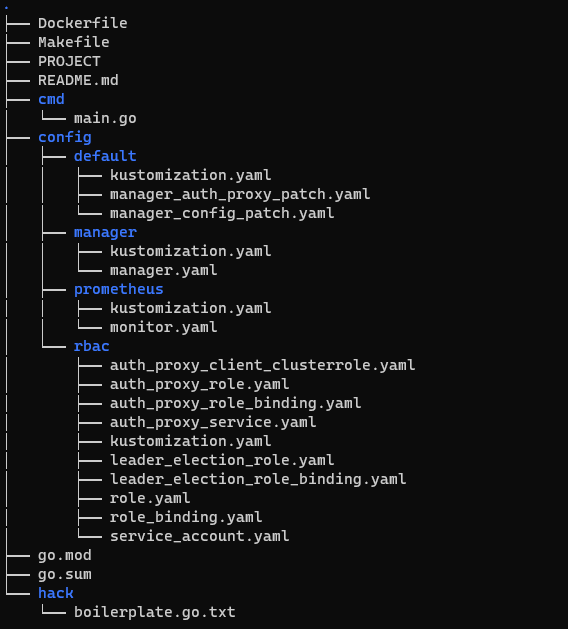
之后kubebuidler会帮助我们生成相关代码:
PROJECT: 关于项目的一些元数据,比如domain、projectName、repo等信息。
config: 一些关于RBAC权限的yaml文件,以及Prometheus监控发现的相关yaml文件,还有控制器部署的yaml文件。
Dockerfile: 整个代码完成之后,打包成镜像使用。
Makefile: 整个程序的编译构建,镜像推送、部署、卸载等操作。
定义CRD 1 kubebuilder create api --group redis --version v1 --kind Standalone
通过以上命令创建CRD,之后可以看到相关yaml:
1
2
3
4
5
6
7
8
9
10
11
12
13
apiVersion: redis.cola.redis/v1 z metadata: labels: app.kubernetes.io/name: standalone app.kubernetes.io/instance: standalone-sample app.kubernetes.io/part-of: kubebuilder app.kubernetes.io/managed-by: kustomize app.kubernetes.io/created-by: kubebuilder name: standalone-sample spec:
yaml中字段正好对应着命令中的各种信息,api/v1/standalone_types.go中有关于CRD的代码实现:
1 2 3 4 5 6 7 8 9 10 11 12 13 14 15 16 17 18 19 20 21 22 23 24 25 26 27 28 29 30 31 32 33 34 35 36 37 38 39 type StandaloneSpec struct {string `json:"foo,omitempty"` type StandaloneStatus struct {type Standalone struct {`json:",inline"` `json:"metadata,omitempty"` `json:"spec,omitempty"` `json:"status,omitempty"` type StandaloneList struct {`json:",inline"` `json:"metadata,omitempty"` `json:"items"` func init ()
部署CRD 当CRD代码实现之后,可以通过make manifests来生成ClusterRole和CustomResourceDefinition配置。
config/crd/bases/crdFile.yaml
config/rbac/role.yaml
相关CRD文件
之后通过make install来部署这个CRD,之后通过api-resource或者kubectl get crd都能够看到这个CRD。
控制器(Controller)实现 虽然CR对应的yaml可以被创建,但是相关的pod是不会运行的,因为没有控制器,等控制器实现之后,整个operator就算是完成了。
控制器部署 demo实现 根据之前步骤,可以明白一个operator是怎么开发出来的,这里参考ot-redis-operator中的Standalone,来开发一个单例redis operator。先来看ot-redis-operator的例子:
1
2
3
4
5
6
7
8
9
10
11
12
13
14
15
16
17
18
19
20
21
--- apiVersion: redis.redis.opstreelabs.in/v1beta1 kind: Redis metadata: name: redis-standalone spec: kubernetesConfig: image: quay.io/opstree/redis:v7.0.5 imagePullPolicy: IfNotPresent storage: volumeClaimTemplate: spec: accessModes: ["ReadWriteOnce" ]resources: requests: storage: 1Gi securityContext: runAsUser: 1000 fsGroup: 1000
这一块对应了Sepc代码:
1 2 3 4 5 6 7 8 9 10 11 12 13 14 15 16 17 18 19 20 21 22 23 24 type RedisSpec struct {`json:"kubernetesConfig"` `json:"redisExporter,omitempty"` `json:"redisConfig,omitempty"` `json:"storage,omitempty"` map [string ]string `json:"nodeSelector,omitempty"` `json:"podSecurityContext,omitempty"` `json:"securityContext,omitempty"` string `json:"priorityClassName,omitempty"` `json:"affinity,omitempty"` `json:"tolerations,omitempty"` `json:"TLS,omitempty"` `json:"acl,omitempty"` `json:"readinessProbe,omitempty" protobuf:"bytes,11,opt,name=readinessProbe"` `json:"livenessProbe,omitempty" protobuf:"bytes,11,opt,name=livenessProbe"` `json:"initContainer,omitempty"` `json:"sidecars,omitempty"` string `json:"serviceAccountName,omitempty"` int64 `json:"terminationGracePeriodSeconds,omitempty" protobuf:"varint,4,opt,name=terminationGracePeriodSeconds"` `json:"env,omitempty"`
这里可以从使用者角度出发,你可以想象一下,如果你需要一个redis实例,你希望填写哪些参数就可以创建出一个redis?这里贴一下我的spec,后续有需要可以在修改,也可以参考redis config中哪些参数是需要的:
1
2
3
4
5
6
7
8
9
10
11
12
13
14
15
16
17
apiVersion: redis.cola.redis/v1 kind: Standalone metadata: labels: app.kubernetes.io/name: standalone app.kubernetes.io/instance: standalone-sample app.kubernetes.io/part-of: kubebuilder app.kubernetes.io/managed-by: kustomize app.kubernetes.io/created-by: kubebuilder name: standalone-sample spec: redisConfigFile: port: version: resourceReqs:
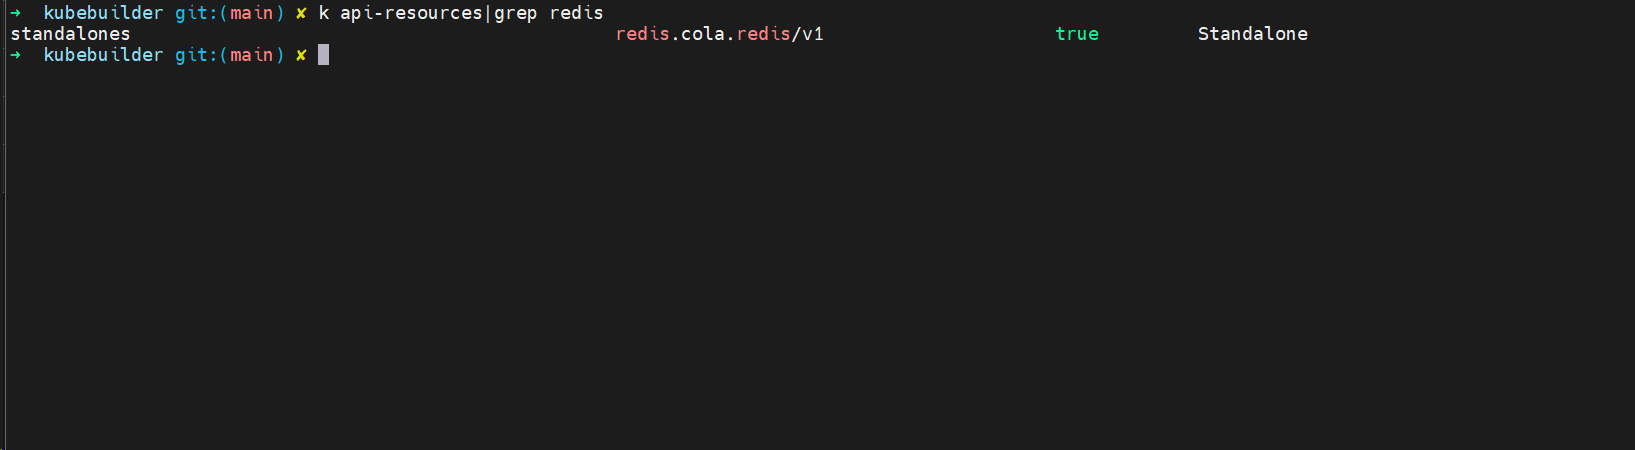
完成spec相关代码编写之后,使用make install,之后通过kubectl api-resource |grep redis来查看刚刚部署的CRD:
之后apply一下我们的yaml文件:
1
2
3
4
5
6
7
8
9
10
11
12
13
14
15
16
17
18
19
20
21
22
23
24
25
26
27
28
29
30
31
32
33
34
35
apiVersion: redis.cola.redis/v1 kind: Standalone metadata: labels: app.kubernetes.io/name: standalone app.kubernetes.io/instance: standalone-sample app.kubernetes.io/part-of: kubebuilder app.kubernetes.io/managed-by: kustomize app.kubernetes.io/created-by: kubebuilder name: standalone-sample spec: RedisConfig: apiVersion: v1 kind: ConfigMap metadata: name: redis-config KubernetesConfig: image: redis imagePullPolicy: Always storage: volumeClaimTemplate: spec: accessModes: - ReadWriteOnce resources: requests: storage: 1Gi volumeMount: volume: - name: your-volume-name persistentVolumeClaim: claimName: your-pvc-name mountPath: - /your/mount/path
需要注意这里的yaml并不能直接使用,需要根据集群情况去调整,这里我对代码进行了调整:
1
2
3
4
5
6
7
type StandaloneSpec struct {`json:"RedisConfig,omitempty"` `json:"KubernetesConfig,omitempty"`
1
2
3
4
5
6
7
8
9
10
11
12
13
14
15
apiVersion: redis.cola.redis/v1 kind: Standalone metadata: labels: app.kubernetes.io/name: standalone app.kubernetes.io/instance: standalone-sample app.kubernetes.io/part-of: kubebuilder app.kubernetes.io/managed-by: kustomize app.kubernetes.io/created-by: kubebuilder name: standalone-sample spec: RedisConfig: KubernetesConfig:
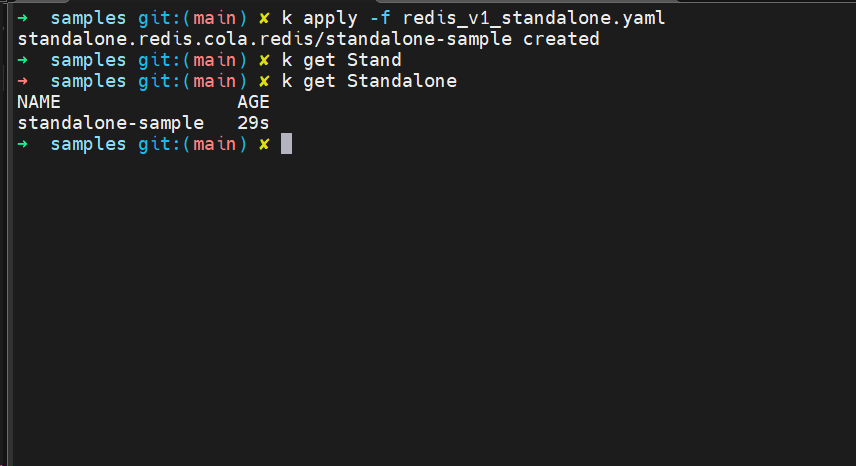
我们可以省去这两个字段apply了,但是不建议这样做,只是为了展示。可以看到应该再集群中运行了,但是相关pod没有被创建,这是因为控制器代码并没有被实现,当控制器实现的时候,我们就能够创建对应pod了。
参考链接